Which One Is Better to Install Wordpress From Hosting Provider or Uploading Wordpress File Manually
Mostly, there are two ways to install WordPress; manually or with the help of software.
How to Install WordPress on GreenGeeks
Installing WordPress isn't hard, still, it does take some time. If you have WordPress hosting from GreenGeeks (if you don't yous should!) with GreenGeeks, you lot will take admission to our Onboarding Wizard, which makes installing WordPress very piece of cake and is done within a few seconds. Beneath is a video walkthrough of How to install WordPress quickly and hands using the GreenGeeks onboarding wizard.
How to Install WordPress (video)
How to Install WordPress Manually
If you prefer to install WordPress manually. You can use this method to create a website for everyone to meet on the Internet or create a staging area for development. Either fashion, Installing WordPress manually isn't as difficult as many might think.
WordPress manual installation. Information technology only takes a few moments and does non require a neat deal of programming knowledge.
You will need to have the proper web hosting account to install WordPress.
Step 1: Download WordPress
Visit the WordPress website and download the newest version. For this tutorial, yous do not want the .tar.gz file. Nosotros're just going to employ the .nothing download.
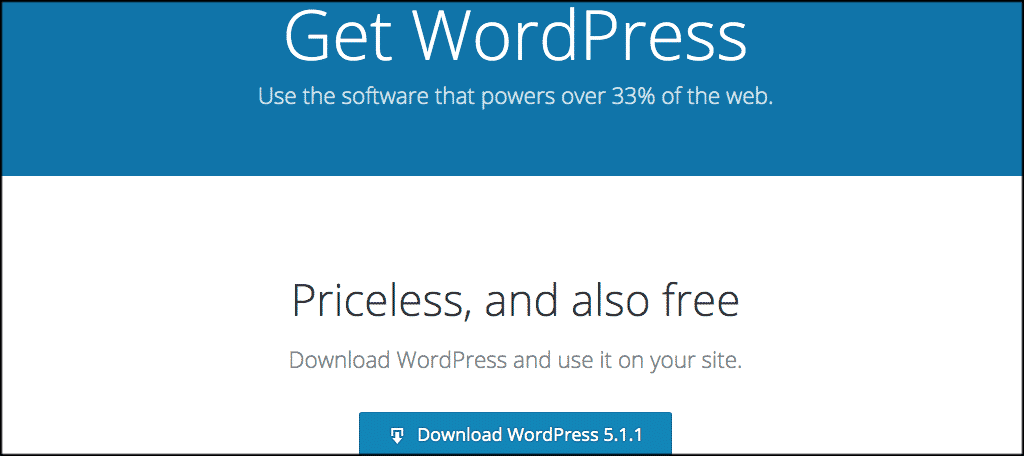
Save the file to a location on your reckoner. I would suggest saving it to the desktop as it makes the file easier to find when you're fix to apply it on your hosting platform.
Step ii: Uploading WordPress
After WordPress has finished downloading the zip file to your calculator, yous volition need to upload the files to your hosting business relationship, namely to your public_html folder.
Some of you may have more than than one domain linked to your hosting business relationship. If this is the case, make certain you lot upload the file to the correct directory.
At that place are 2 ways to upload the files for WordPress hosting:
- Using an FTP client such equally Filezilla
- Using File Manager in cPanel
Either of these systems will work just the same for uploading your .zip file. I prefer to utilise cPanel simply considering it doesn't require installing a program to use it. However, using FileZilla does have its advantages, such every bit giving you a program that tin can help make local backups of your website.
Using FTP client
File Transfer Protocol, or FTP, is a useful tool when yous want to dig into developing a website. To use FileZilla or another FTP programme, you lot will need to unpack the naught file onto your reckoner. So, you'll upload all of the files to the correct directory on your hosting account.
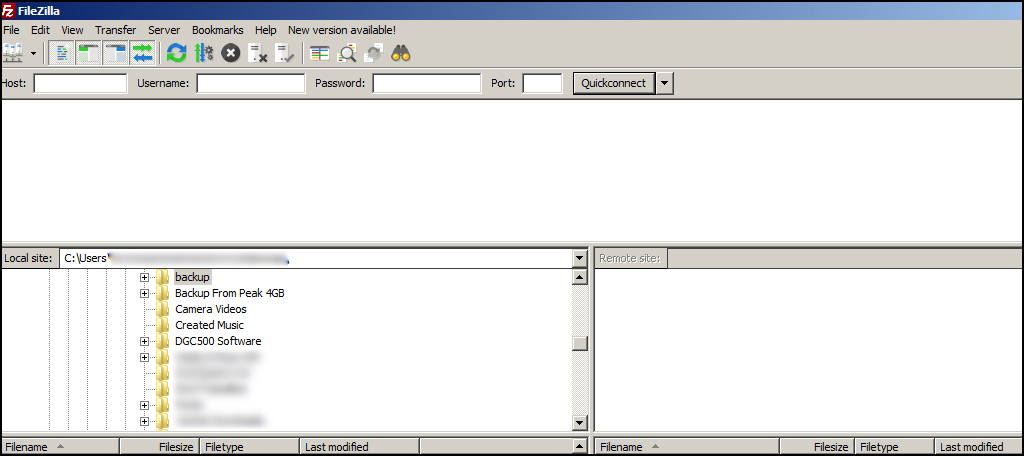
The overall process of FTP for setting up WordPress is a chip more than time-consuming than using cPanel'southward File Manager. Just if you're looking to put in a fleck of extra piece of work for programming development or need to create a re-create of your site, programs like FileZilla are ideal.
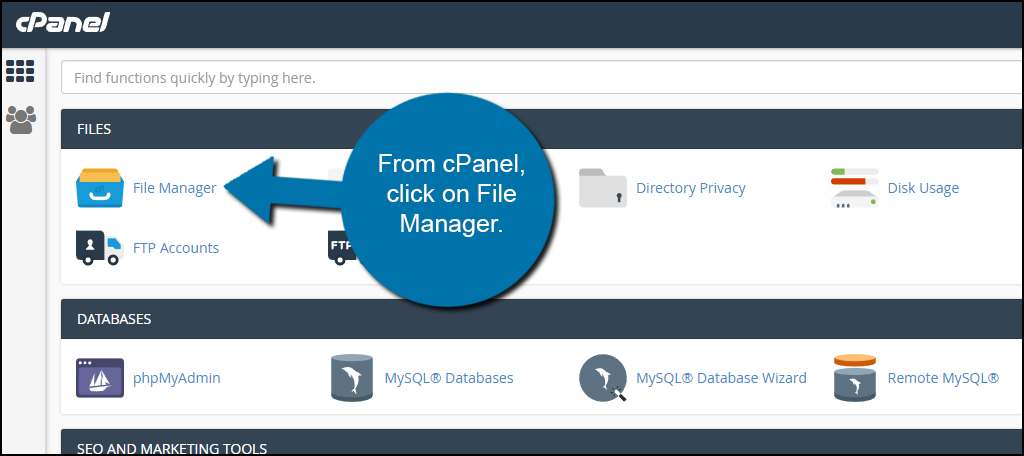
Using File Manager
File Manager is built with a wide range of tools. Ane of the reasons why I prefer this method to FTP applications is considering information technology is attainable from virtually any spider web browser.
From cPanel, click on File Manager.
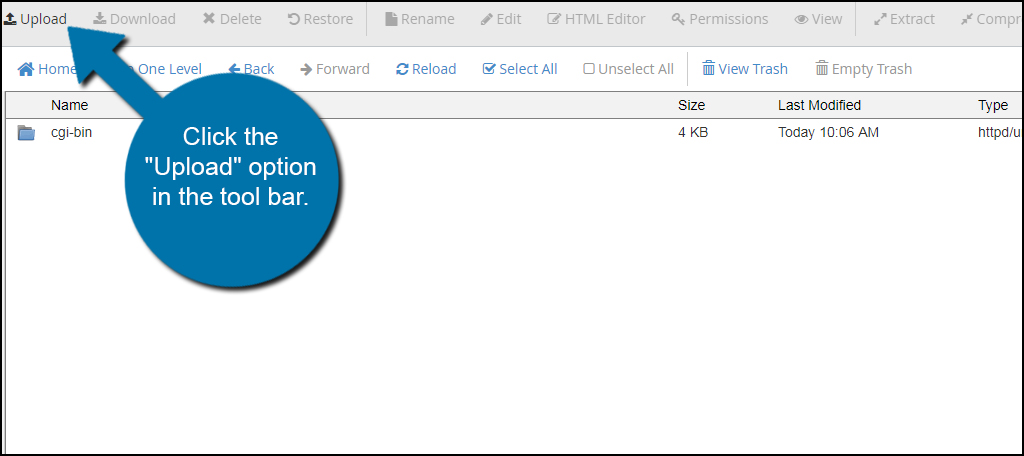
Access the directory you want to employ by clicking, "public_html."

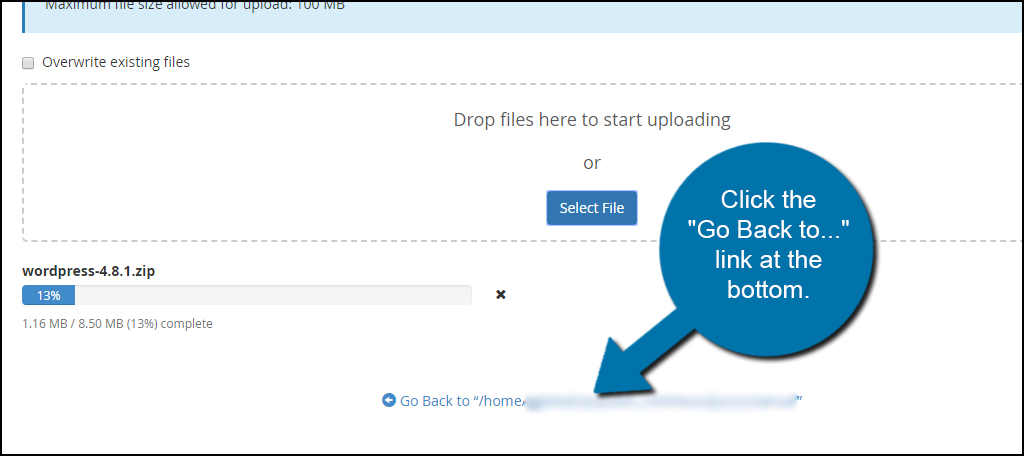
Once y'all're in the correct directory, click the "Upload" option in the toolbar.
You volition click the "Select File" and upload the .zip you downloaded from WordPress.org. Once the upload is complete, click the "Go Back to…" link at the lesser.
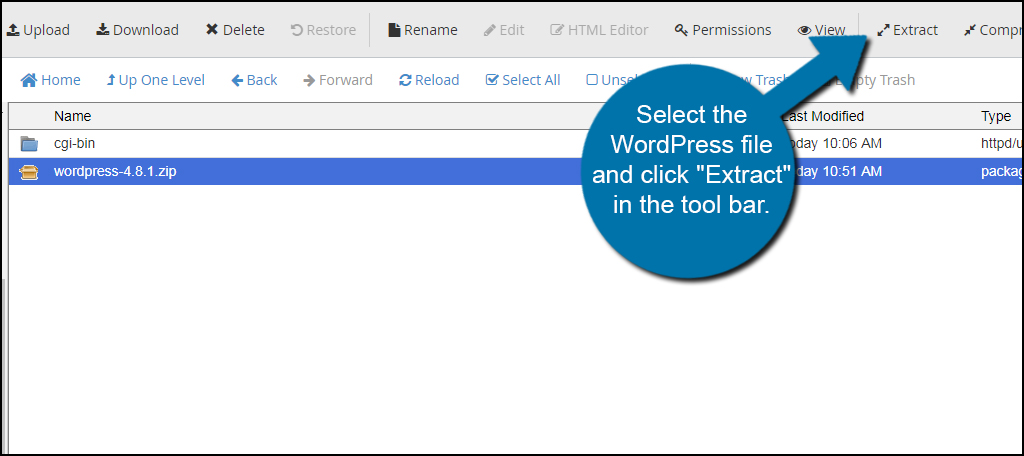
Select the WordPress file and click "Extract" in the toolbar. You tin select the file by clicking it once with your mouse.
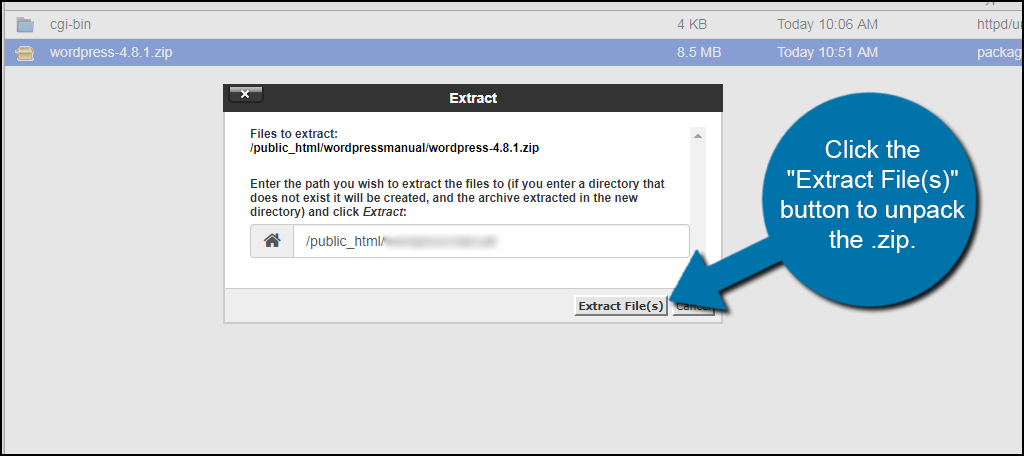
A new window volition appear asking where you want the files extracted to. In this instance, you'll leave the default directory that is shown. Click the "Extract File(south)" push button to unpack the .null.
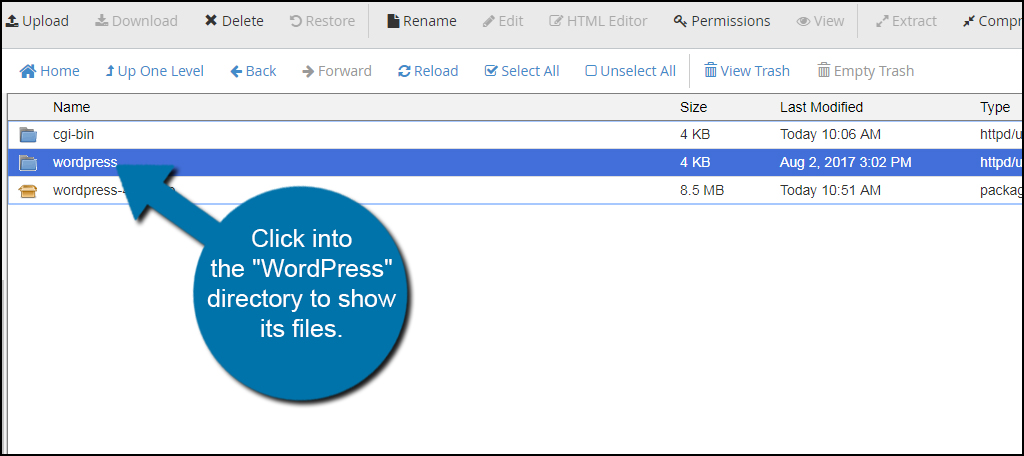
Because of how the .nada file is set upward, you'll see a "WordPress" folder in your directory. Nosotros're going to move the contents of this folder so we can continue the installation properly.
If you don't move the files, your website will be located at "https://world wide web.ggexample.com/wordpress" (supersede "ggexample.com" with your domain). It'south not very attractive this way and may be disruptive for some visitors.
Click into the "WordPress" directory to show its files. You tin can use double-click to do this.
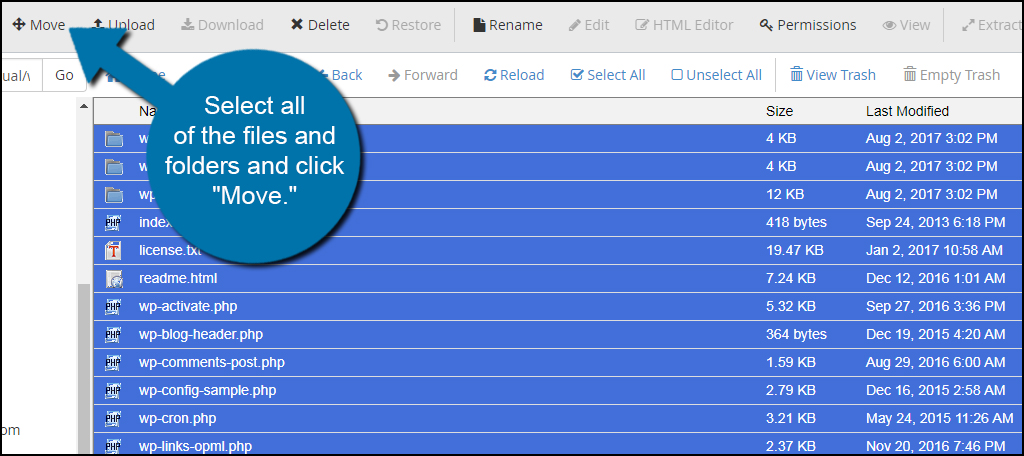
Select all of the files and folders and click "Movement." If yous take a PC, y'all can click the top binder and then hold downwardly CTRL while clicking the final file. Mac users can use the Command key.
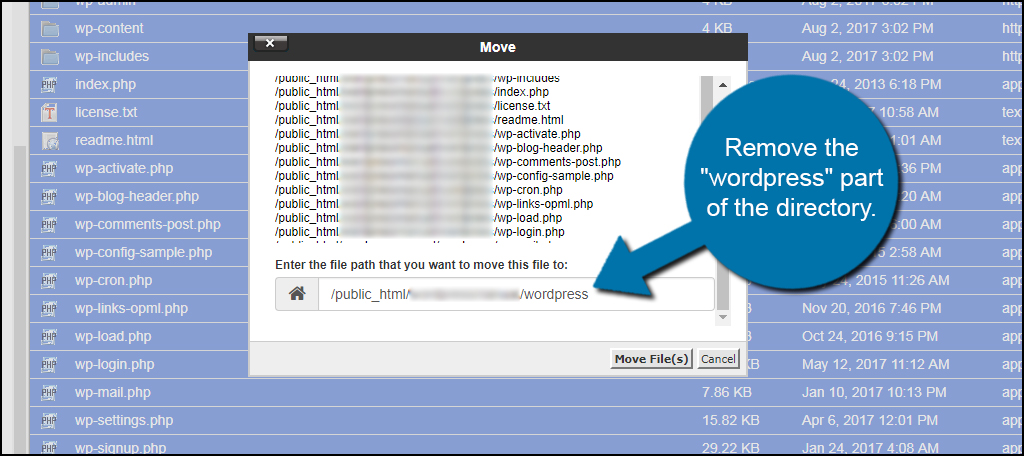
A new window volition appear for moving all of the files and folders. Remove the "wordpress" part of the directory. It will be at the end of the path. If you only have ane domain name, then your file path should look similar "/public_html/."
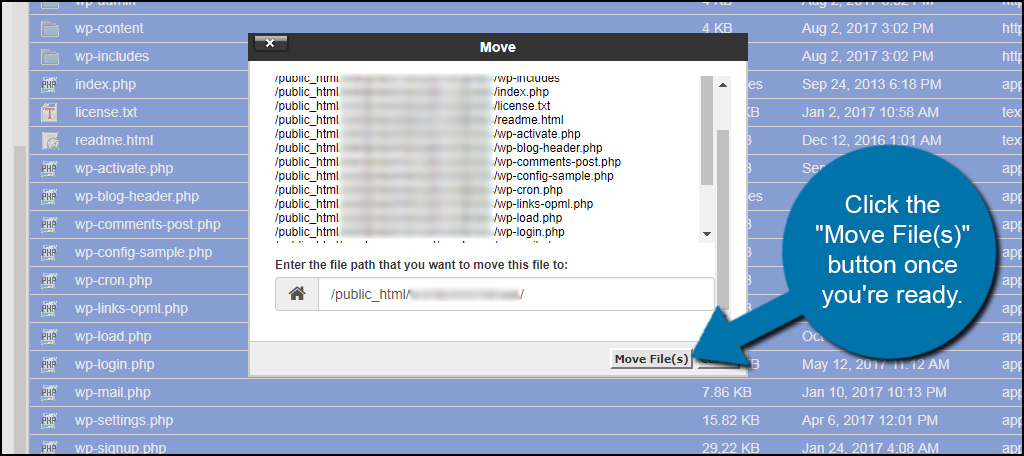
Click the "Move File(s)" button once yous're ready.
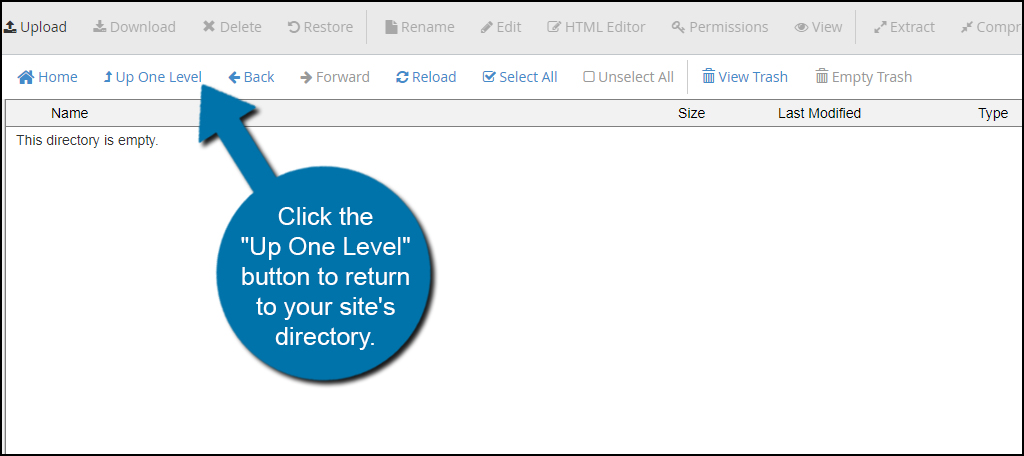
When the files are moved, click the "Upwardly 1 Level" button to return to your site'southward directory.
Setting Up the Database
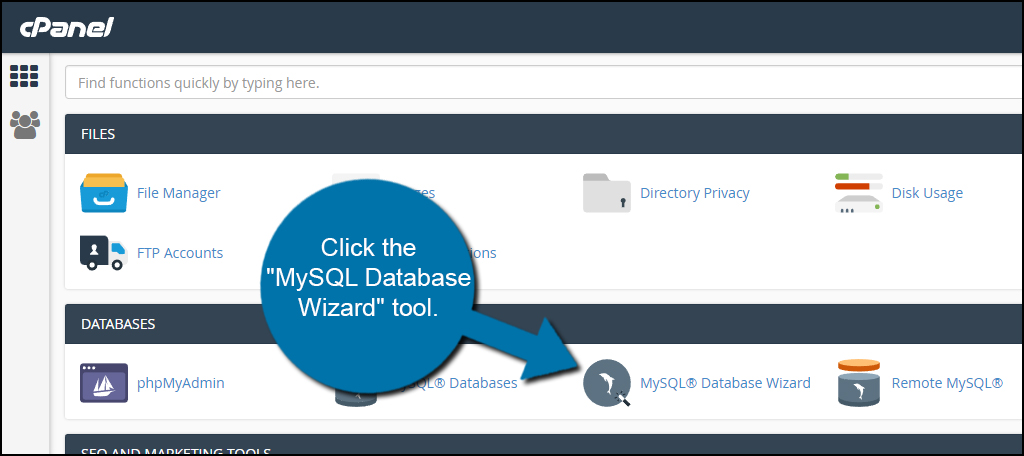
Before you begin with the actual installation, you will need to create a database on your hosting account. This volition allow WordPress to save data needed for the website to function.
From the cPanel dashboard, click the "MySQL Database Magician" tool.
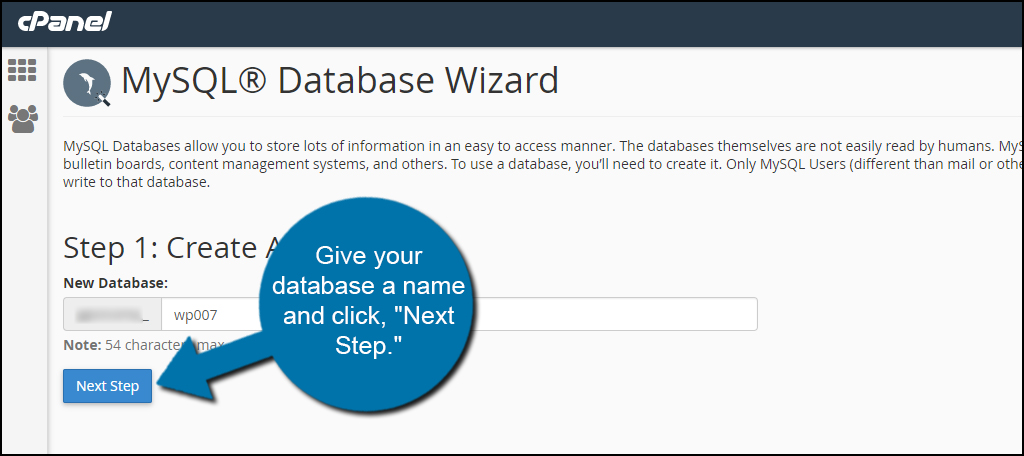
Give your database a name and click, "Next Pace." Proceed it something simple and easy to identify. For instance, I'chiliad going to use "wp007."
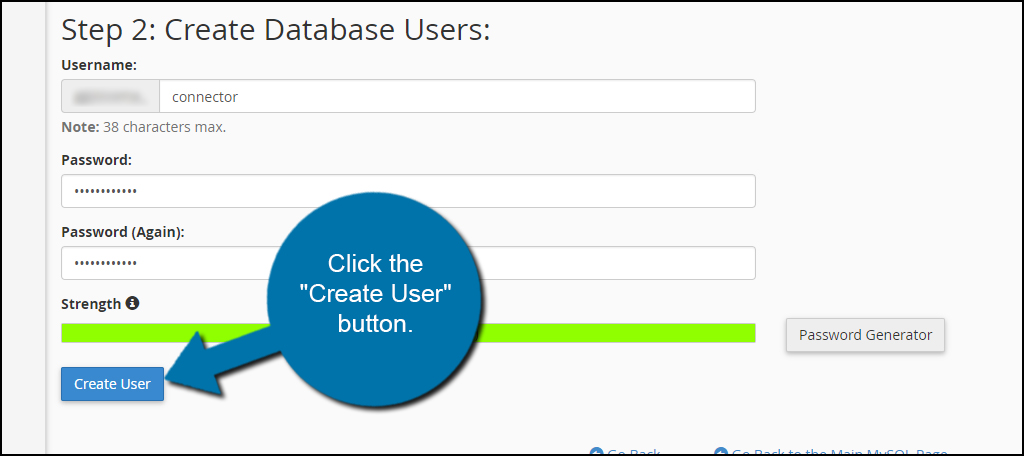
Assign a username and password. This will exist how your WordPress website will connect to the database. Avert things similar "admin" when creating a username. For this tutorial, I am going to phone call information technology "connector" and use the Password Generator.
Accept annotation of the:
- Database name
- Username
- Password
You lot will need this information in the next stride.
When y'all're done setting up the information, click the "Create User" button.
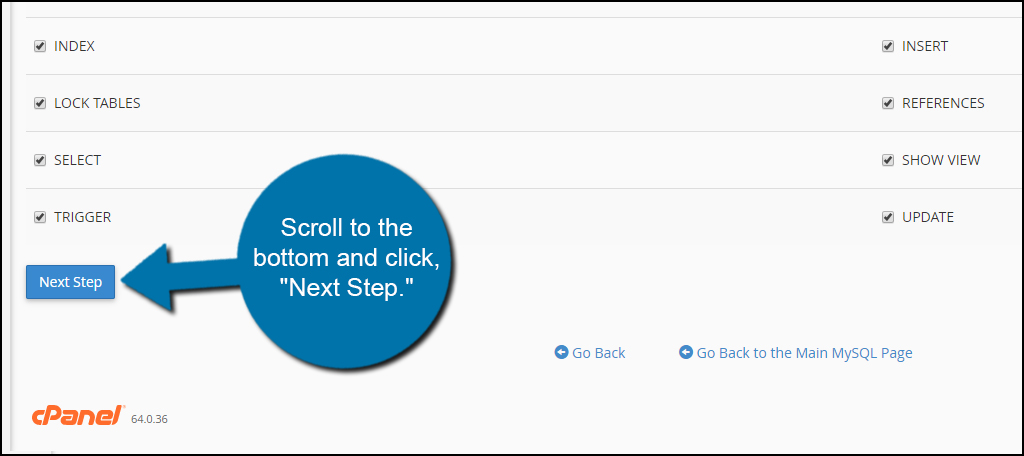
In the next screen, yous'll assign privileges for this account. Considering this is the main access point for WordPress, it needs to have everything. Click the "All Privileges" checkbox.
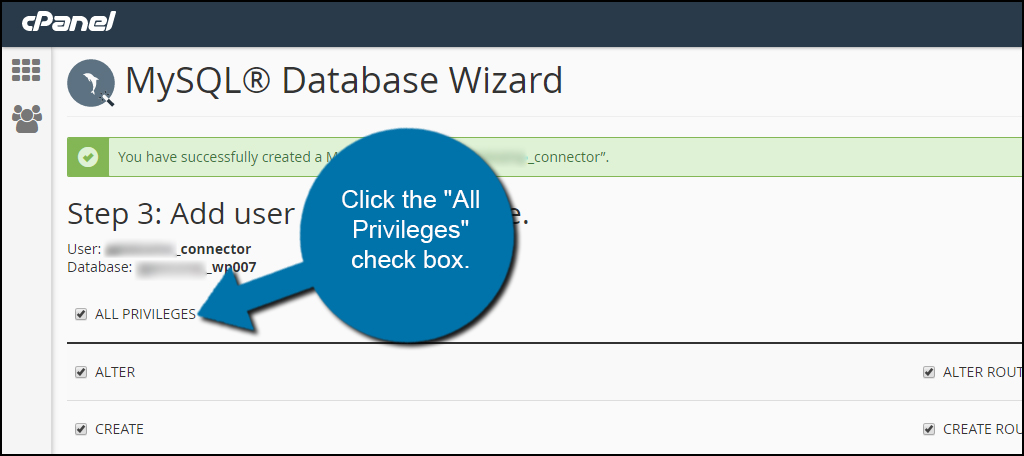
Gyre to the bottom and click, "Side by side Footstep."
Your database is now ready for WordPress to use it. Brand sure you copied downwards your database proper name, user and password correctly.
Footstep 4: Installing WordPress
Adjacent, we will prepare your blog. To do this, head over to https://www.ggexample.com/wp-admin/install.php. If your blog is in a subdirectory, and then go to https://www.ggexample.com/subdirectory/wp-admin/install.php instead.
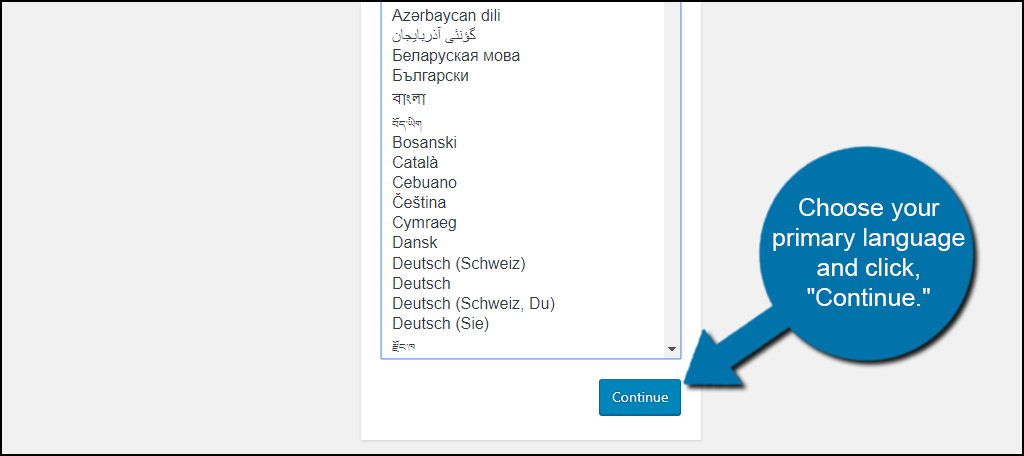
The first screen is a language selection window. Choose your master language and click, "Continue." English language may already exist selected by default depending on the version of WordPress you downloaded from the developer'south website.
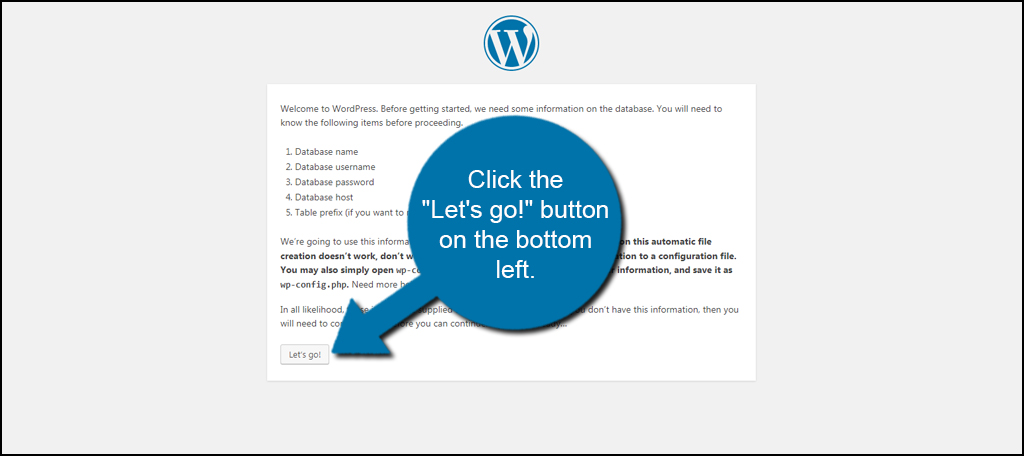
The adjacent screen tells y'all the elements you'll demand to know before installing WordPress. This is the aforementioned data I told you to take note of earlier. Click the "Let's go!" push on the lesser left.
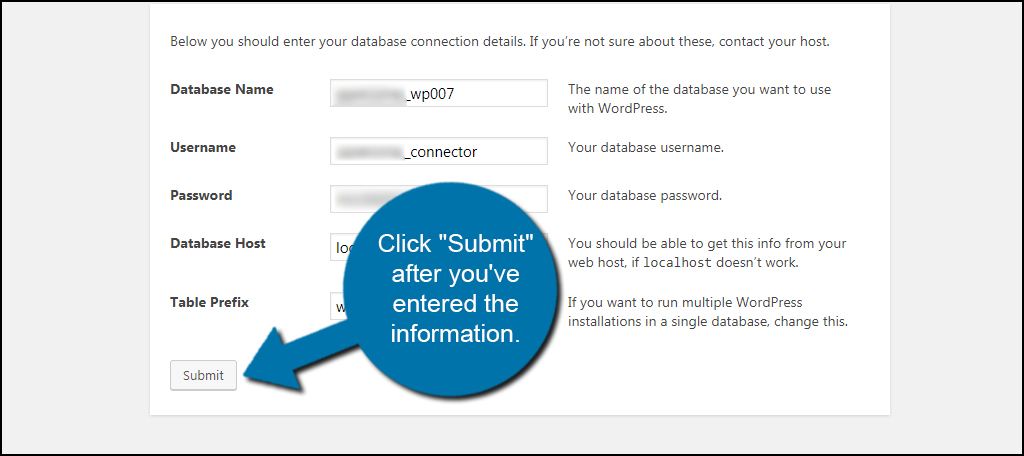
Insert your database name, username, and password. Leave the "Database Host" as localhost. This volition work with the bulk of web hosts including GreenGeeks. If "localhost" doesn't work for you, and so you'll need to get the info from your hosting provider or customer support.
Get out the "Table Prefix" untouched likewise, unless you plan on running multiple installations of WordPress in a single database.
Accept into account the prefix to your database name and username. Unremarkably, this volition starting time with the primary business relationship name. Information technology will expect something like, "accountname_" complete with the underscore. This is visible when y'all're setting up the database.
Click "Submit" after you lot've entered the information.
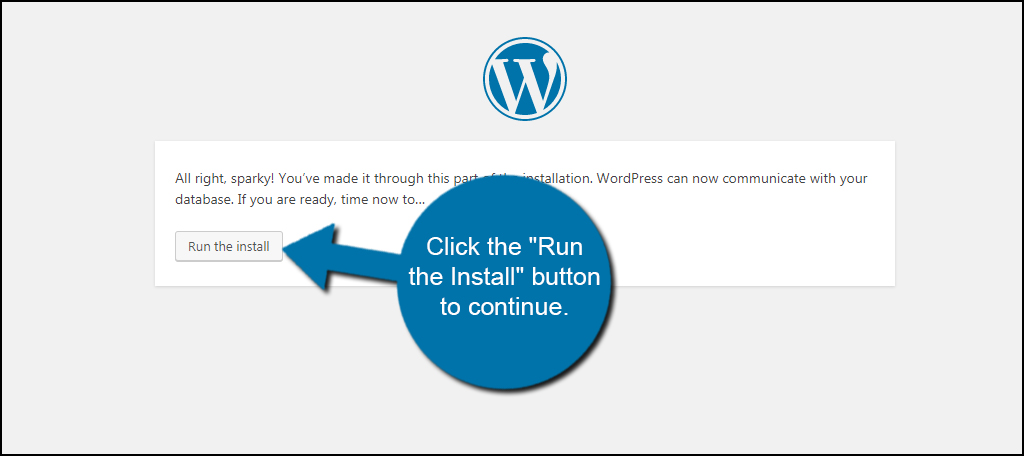
On the next screen, click the "Run the Install" push button to go along.
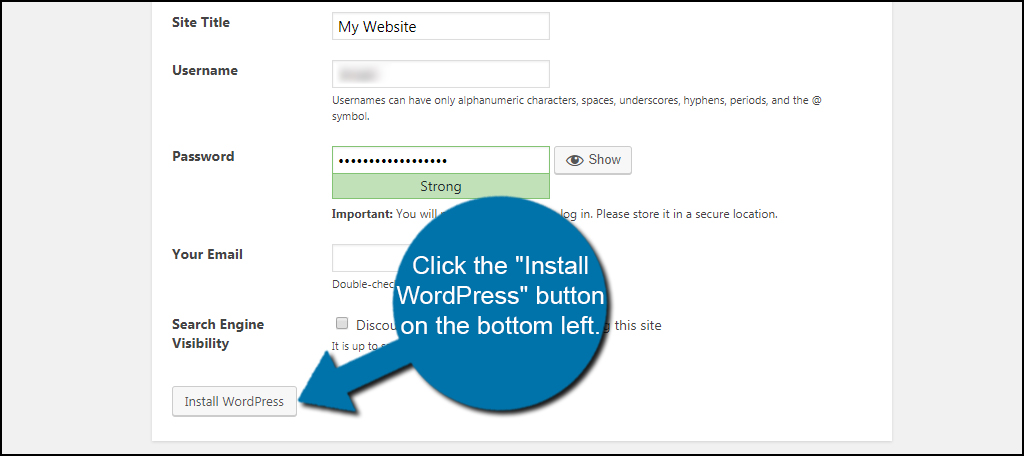
Yous will demand to enter some admin information. Input the championship of your site, the admin username, password, and your email address. Information technology's best that you do not use "admin" for the administrator account. It'due south one of the showtime things bots and hackers endeavour when trying to gain access to whatever website.
Make a note of your username and password. You volition need these to log in to your WordPress Dashboard to manage your site.
Once you lot've entered your information, click the "Install WordPress" button on the bottom left.
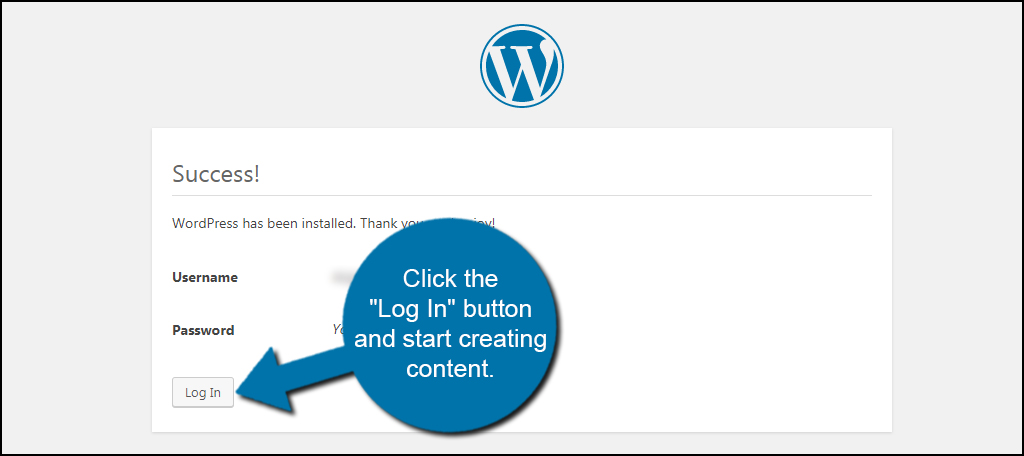
Congratulations, yous have set upwards your site. All you demand to do now is click the "Log In" button and start creating content.
That's how you install WordPress manually.
How to Install WordPress with Softaculous
Softaculous is an application installer that automates setting upwards various direction systems. In this instance, it will install WordPress and its database after just a few pieces of data from yourself. It's a quick and easy style to fix upwards a website without having to learn a single line of code.
I'm going to show yous how to install WordPress with Softaculous. In mere moments, you tin can get-go promoting your website and begin building something spectacular.
Step one: Open up the Softaculous App Installer
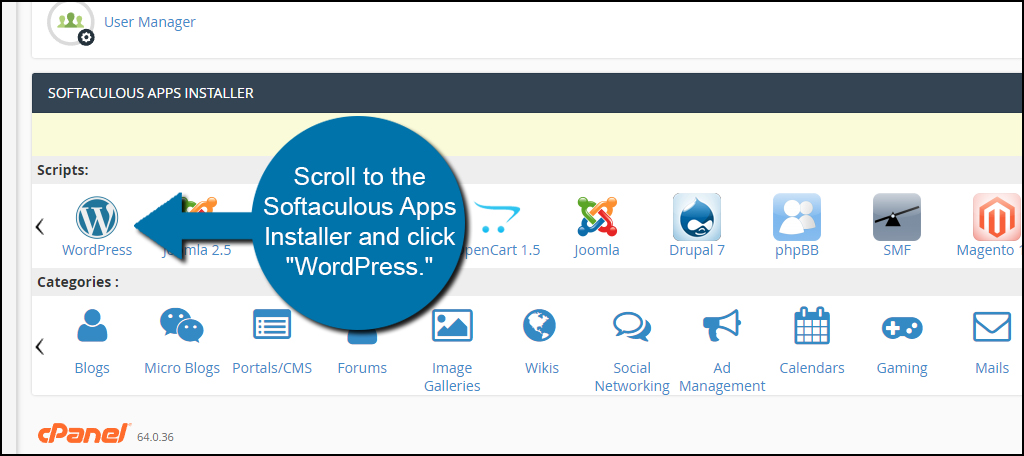
When you have a GreenGeeks hosting business relationship, you'll have access to cPanel. This is a versatile administrative dashboard that gives you control over many aspects of your website.
From cPanel, scroll to the Softaculous Apps Installer and click "WordPress."
Step 2: Install WordPress
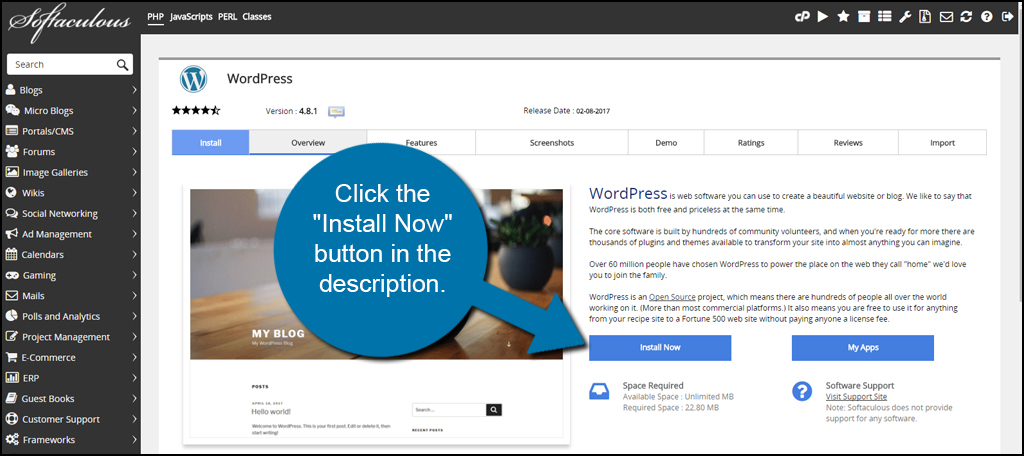
From the Softaculous script window, click the "Install At present" push in the description. The Softaculous software will usually have the most contempo version of WordPress available. If you desire to install an older version, you may take to do it manually.
In the side by side screen, you will need to input all of your website'due south settings. Allow me break them down a bit for you:
- Software Setup
In this section, yous'll choose whether your site uses SSL protocols or not. This is done by selecting which "http:" version you want to apply from the drop down options. You'll as well pick your domain. If you lot only have ane domain name, it will exist displayed automatically. Otherwise, y'all'll have to select it from the list. - Site Settings
This is the bones information of your website. Yous'll put in your site's proper noun and a brusque clarification. This will be used by most themes too as the WordPress arrangement for identification purposes. Information technology will also play a part in search engine optimization, so make certain the information is something you want seen in sites like Google. - Admin Business relationship
Input the admin username and password you desire to use to log into WordPress. I suggest never using the name "admin" as the ambassador username. It'due south the commencement matter bots and hackers will try when attempting to access your website. Make it something completely unique to yous. - Admin Electronic mail Accost
This accost is only used by WordPress itself and is not available publicly. Plugins y'all install may too use this accost to send yous messages or updates. It tin can as well exist used for password recovery should you forget or lose your login credentials. - Choose Language
This is set as English by default. However, you lot have the choice of using many different linguistic communication types for WordPress. Choose 1 that is platonic for you and your website. - Select Plugins
Softaculous oft comes with a couple of Plugins readily bachelor should yous choose. GreenGeeks displays "Loginizer" and "WPForms Lite." These two plugins are very helpful for those who want to protect the login screen and create forms such equally what you would use for contact information. Click the cheque boxes to activate or deactivate these optional plugins. - Advanced Options
Avant-garde options are for those who accept a house grasp of databases, upgrades and backup command. You lot tin customize these elements if you wish, but I would suggest new users to get out these settings. - Select Theme
WordPress comes with a few themes readily bachelor. These files dictate how your website appears. In Softaculous, you can choose from a wide variety of layouts. Merely click the one you lot want to install with WordPress and Softaculous will practise the remainder. Please note that you tin can change themes at any time and as often as you like.
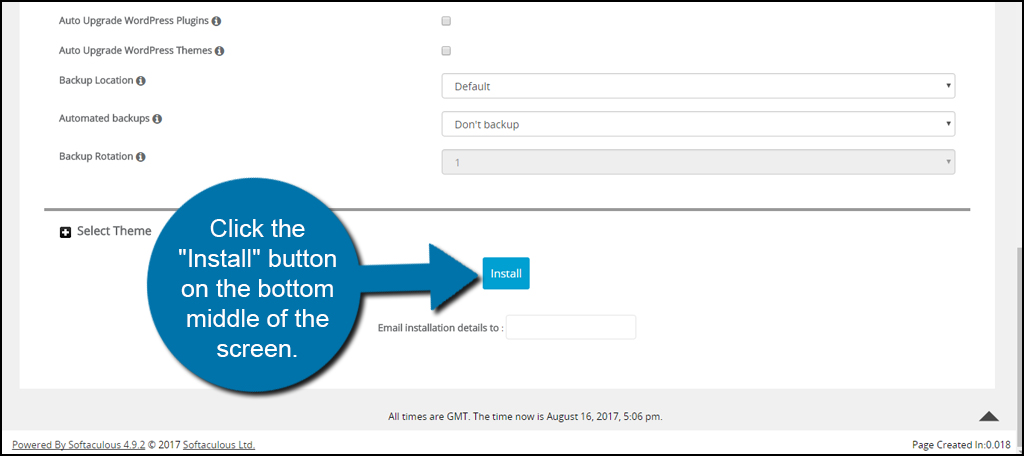
NOTE: At the bottom of the screen, below the "Install" button, you can assign an email address to send installation details. It may exist helpful to have a record of the process. Yet, this is completely optional.
Once you're washed fine-tuning WordPress, click the "Install" button on the bottom middle of the screen.
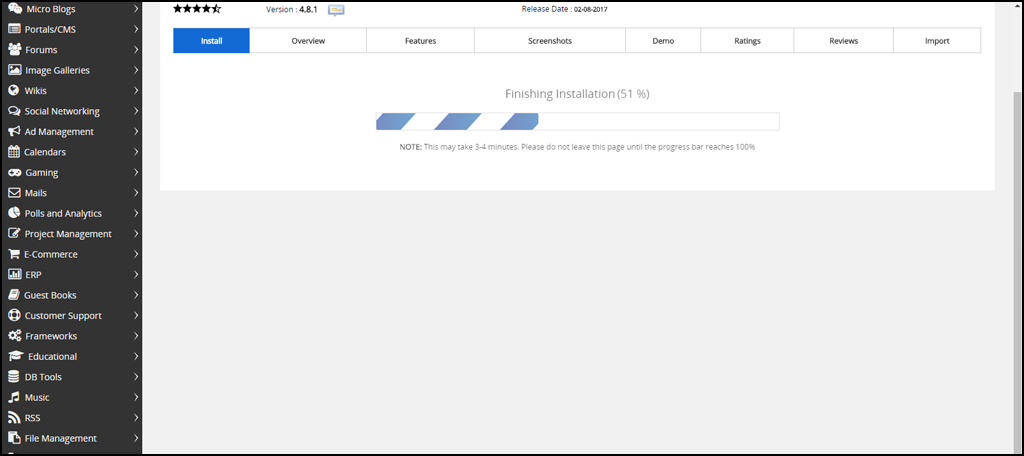
Softaculous will so analyze your information and settings while installing the WordPress CMS onto your website.
After the installation is complete, Softaculous will give you a couple of links. Ane is the URL of your new website while the other is the admin address. Click the link next to "Authoritative URL" to visit the login screen and access your site.
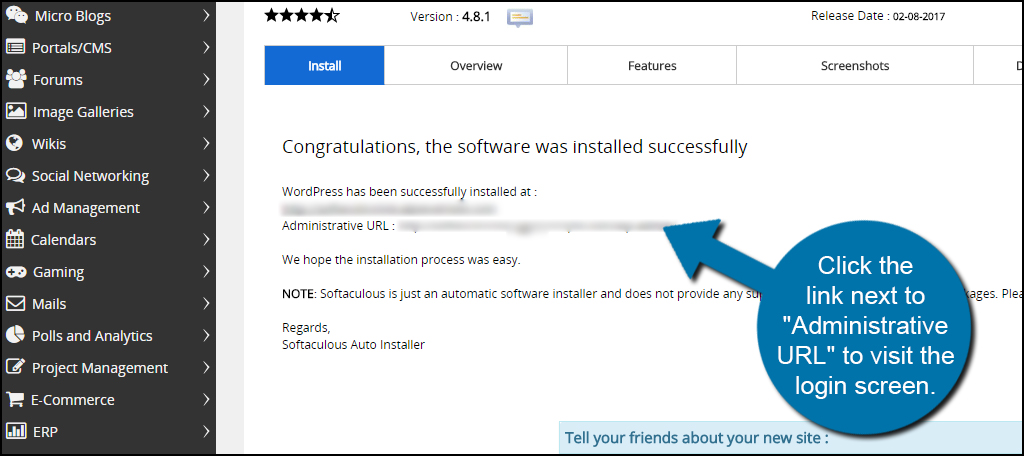
Bookmark this URL and so you tin can observe it easier at a later date.
After you install WordPress, information technology's fourth dimension to get started creating content and building an attractive site people will love. Whether you lot desire to offset a web log to make money or plan on selling products from an online store, WordPress is a stiff platform to utilize. Become your creative juices flowing and blueprint the adjacent biggest online craze.
What kind of a website are you lot planning to design? What kind of plugins practise you lot prefer when setting up your site for the first time?
willistheareetweet.blogspot.com
Source: https://www.greengeeks.com/tutorials/how-to-install-wordpress/
Post a Comment for "Which One Is Better to Install Wordpress From Hosting Provider or Uploading Wordpress File Manually"